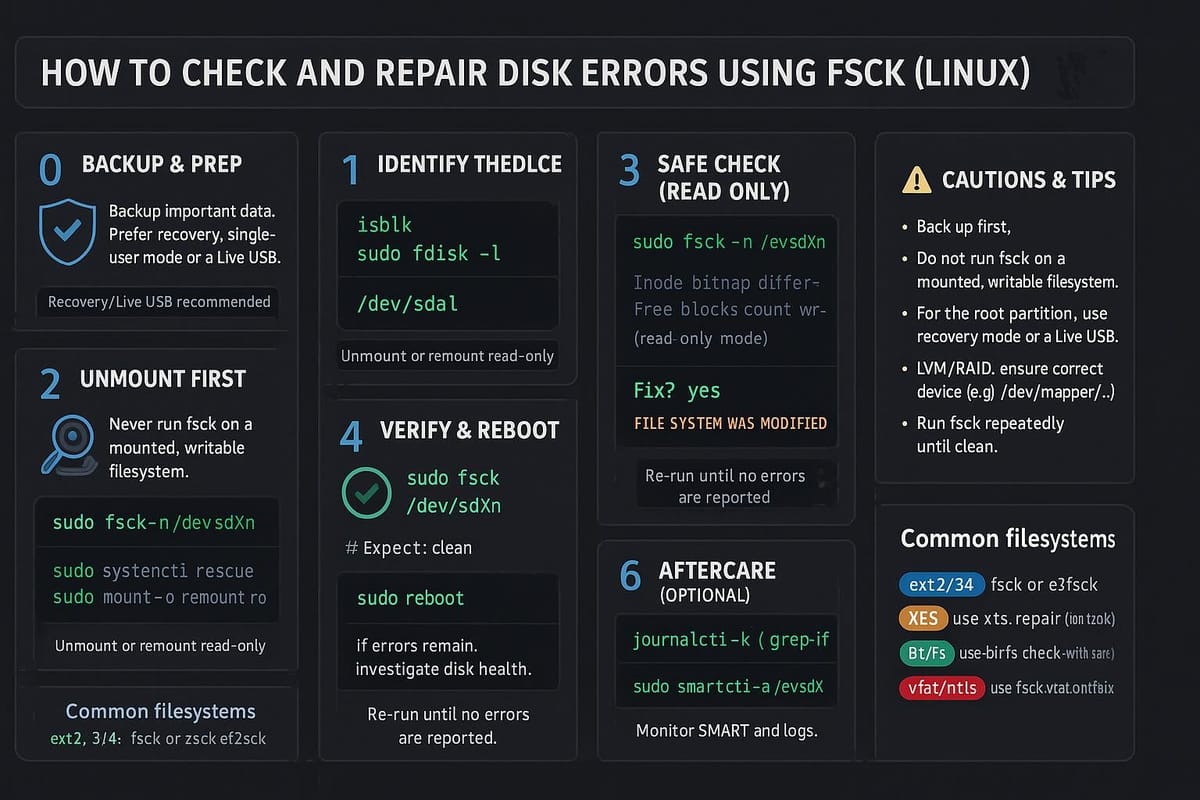
How to Check and Repair Disk Errors Using fsck
Learn how to use fsck to check and repair disk errors on Linux with step-by-step commands and safety tips for beginners. Covers mounting, backups, common flags, and recovery best practices.

Short introduction
fsck (file system consistency check) is the standard tool on Unix-like systems to detect and repair filesystem errors. This tutorial explains when to use fsck, how to prepare, common commands, and how to interpret output so you can safely fix disk issues.
What is fsck and when to use it?
fsck is a front-end that runs the appropriate filesystem-specific checker (like e2fsck for ext4, fsck.xfs for XFS, etc.). Use it when you see filesystem corruption symptoms (mount failures, I/O errors, unexpected reboots, or kernel messages about inode or block inconsistencies).
Key signs you might need fsck:
- Boot messages complaining about filesystem errors.
- mount failing with "illegal option" or "invalid superblock".
- Files suddenly missing or files with weird sizes.
- Repeated read/write errors in dmesg.
Quick checks to identify your filesystem and device:
# List block devices with filesystem type
lsblk -f

# Or identify a specific partition
sudo blkid /dev/sda1
Output will show TYPE=ext4, xfs, etc. Note: XFS uses xfs_repair (fsck.xfs does nothing), so use the correct tool for your filesystem.
Preparing to run fsck
Safety first: fsck should not be run on a mounted, writable filesystem — that can cause corruption. Make sure you have backups, unmount the target, and if it's the root filesystem, plan to run fsck from a live system or schedule it at boot.
Common preparation steps:
# Check if partition is mounted
mount | grep /dev/sda1

# Unmount a filesystem (replace device or mount point)
sudo umount /dev/sdb1

# Make sure all writes are flushed (optional)
sync
If the partition is in use (e.g., root), consider:
- Booting from a live USB and running fsck on the unmounted device.
- Scheduling a check at next boot: create /forcefsck on many distros, or use systemd tools.
Example to force a check on next reboot:
# Force a filesystem check at next reboot (common on many Linux distros)
sudo touch /forcefsck
sudo reboot
If you must inspect a mounted filesystem, run read-only checks only (fsck -n) and avoid making repairs while mounted.
Running fsck and quick commands reference
This section shows common fsck usage and a compact commands table. Always run fsck on an unmounted device when possible.
Basic usage examples:
# Run a check (prompts before fixes)
sudo fsck /dev/sdb1

# Automatically answer 'yes' to fixes (use with caution)
sudo fsck -y /dev/sdb1

# Don't make any changes; show what would be done
sudo fsck -n /dev/sdb1
Commands reference (common flags and examples):
| Command/Option | Purpose | Example |
|---|---|---|
| fsck /dev/sdXN | Run check and interactive repair | sudo fsck /dev/sdb1 |
| fsck -y /dev/sdXN | Automatically answer yes to fixes | sudo fsck -y /dev/sdb1 |
| fsck -n /dev/sdXN | No changes; dry run | sudo fsck -n /dev/sdb1 |
| fsck -f /dev/sdXN | Force check even if marked clean | sudo fsck -f /dev/sdb1 |
| fsck -C 0 /dev/sdXN | Show progress (if supported) | sudo fsck -C 0 /dev/sdb1 |
| fsck -A | Walk /etc/fstab and check all filesystems | sudo fsck -A -y |
Note: For ext-family filesystems, fsck calls e2fsck; you can call e2fsck directly for ext2/3/4 features:
# Force full check for ext4
sudo e2fsck -f -v /dev/sdb1
For XFS, use xfs_repair (fsck.xfs is a stub):
# Example XFS repair (do on unmounted)
sudo xfs_repair /dev/sdb1
Running fsck and interpreting output
When you run fsck you'll see safety prompts and status lines. Understand common outputs:
Example run:
sudo fsck -f /dev/sdb1
e2fsck 1.45.5 (07-Jan-2020)
/dev/sdb1: clean, 12345/65536 files, 23456/262144 blocks
If corruption exists, you may see:
/dev/sdb1: Inode bitmap differences:     0:1:2:3
Pass 1: Checking inodes, blocks, and sizes
Pass 2: Checking directory structure
Pass 3: Checking directory connectivity
Pass 4: Checking reference counts
Pass 5: Checking group summary information
UNEXPECTED INCONSISTENCY; RUN fsck MANUALLY.
Meaning and actions:
- "clean" — no action needed.
- Prompts like "Fix? yes/no" — fsck asks whether to apply fixes. Use -y to auto-accept, or choose manually if you want control.
- "UNEXPECTED INCONSISTENCY" — usually requires interactive repair; if that fails, restore from backup.
- If fsck reports badblocks or unrecoverable inode errors, consider imaging the partition (ddrescue) before further writes.
Sample interactive flow (choose carefully):
# Interactive example (respond 'y' for fixes)
sudo fsck /dev/sdb1
# ... prompts ...
# Fix<y>? y
Advanced tips:
- Run fsck twice if you see repeated problems — sometimes the first pass fixes metadata allowing further corrections.
- Use verbose (-v) or progress (-C) options to monitor long runs.
- If fsck cannot repair a filesystem, copy important data off the device and rebuild the filesystem.
Common Pitfalls
- Running fsck on a mounted, writable filesystem: this can cause more damage. Always unmount first or use a live environment.
- Blindly using -y every time: auto-accepting fixes can lead to data loss if fsck removes or reassigns inodes. Review prompts when data is critical.
- Using the wrong tool for your filesystem: XFS requires xfs_repair, not fsck/e2fsck. Verify filesystem TYPE with lsblk -f or blkid before repairing.
Next Steps
- Back up important data now: make a copy of critical files or image the partition (ddrescue) before further repairs.
- Practice on a test VM or spare disk: simulate fsck runs to become comfortable with prompts and workflows.
- Automate monitoring: enable SMART (smartd) and periodic checks so you catch disk problems early.
👉 Explore more IT books and guides at dargslan.com.


