How to Configure a Static IP on Ubuntu Server
Short introduction
A stable static IP is essential for servers that host services, need consistent SSH access, or are referenced by other systems. This guide shows you how to configure a static IPv4 address on an Ubuntu Server (modern releases that use Netplan) with clear examples, checks, and troubleshooting tips.
Prerequisites and checking your current network
Before making changes, collect important information: the network interface name, current IP (to avoid conflicts), subnet mask, gateway, and DNS servers. You should have sudo access on the server and be comfortable editing files.
Check basic info:
# Show Ubuntu version and Netplan version
lsb_release -a
netplan --version

# Show interfaces and addresses
ip addr show

# Show routing table
ip route show
Identify the interface you want to configure — common names are enp3s0, ens160, or eth0. Example output snippet:
$ ip addr show
2: enp3s0: <BROADCAST,MULTICAST,UP,LOWER_UP> mtu 1500 ...
    inet 192.168.1.45/24 brd 192.168.1.255 scope global dynamic enp3s0
Commands table (quick reference)
| Command | Purpose | Example |
|---|---|---|
| ip addr show | Shows interfaces & IPs | ip addr show |
| ip route show | Shows routing table | ip route show |
| sudo nano /etc/netplan/*.yaml | Edit netplan config | sudo nano /etc/netplan/01-netcfg.yaml |
| sudo netplan generate | Validate & render configs | sudo netplan generate |
| sudo netplan apply | Apply network changes | sudo netplan apply |
| sudo journalctl -u systemd-networkd -b | View networkd logs | sudo journalctl -u systemd-networkd -b |
(You can copy any of the example commands above into your terminal.)
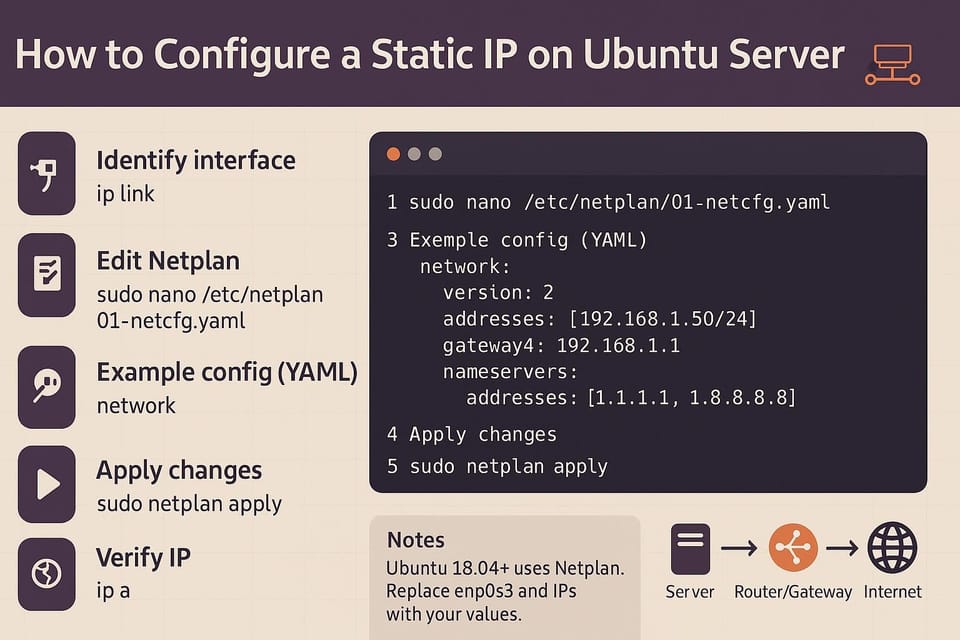
Write the Netplan configuration to set a static IP
On Ubuntu Server (18.04+), Netplan manages network configuration and emits backend configs for systemd-networkd or NetworkManager. For servers, the renderer is typically networkd.
Edit or create a YAML file under /etc/netplan/. Filenames typically end in .yaml (e.g., 01-netcfg.yaml). YAML is indentation-sensitive — use spaces, not tabs.
Example static configuration:
# /etc/netplan/01-netcfg.yaml
network:
  version: 2
  renderer: networkd
  ethernets:
    enp3s0:
      dhcp4: no
      addresses: [192.168.1.100/24]
      gateway4: 192.168.1.1
      nameservers:
        addresses: [8.8.8.8, 1.1.1.1]
Steps to edit:
sudo cp /etc/netplan/01-netcfg.yaml /etc/netplan/01-netcfg.yaml.bak   # backup if it exists
sudo nano /etc/netplan/01-netcfg.yaml
# (paste YAML and save)
Notes and common alternatives:
- If your server uses NetworkManager (desktop installs), set renderer: NetworkManager instead of networkd.
- For IPv6 add an addresses entry like "2001:db8::100/64" and configure gateway6.
- To assign multiple addresses, list them in addresses: [addr1/len, addr2/len].
Apply changes and verify connectivity
After saving the YAML, validate and apply. Netplan will render backend configs and activate the network.
Generate and apply:
sudo netplan generate    # generates backend configs and validates YAML
sudo netplan apply       # applies the configuration immediately
If you'd like a safe try: use netplan try (it reverts automatically if you don't confirm):
sudo netplan try
# You will have 120 seconds to confirm the change; if something breaks,
# it will roll back automatically, restoring remote access.
Verify the interface was configured:
ip addr show enp3s0
ip route show
Test connectivity:
# Ping gateway and external IP
ping -c 3 192.168.1.1
ping -c 3 8.8.8.8

# Test DNS resolution
nslookup ubuntu.com 8.8.8.8
If connectivity fails, inspect logs:
# If using systemd-networkd
sudo journalctl -u systemd-networkd -b --no-pager

# If using NetworkManager
sudo journalctl -u NetworkManager -b --no-pager
Useful troubleshooting commands:
- sudo netplan --debug apply will show more diagnostic output.
- sudo netplan try to attempt a temporary change and avoid locking yourself out.
Common Pitfalls
- YAML indentation and syntax errors:
- Mistyping or wrong indentation in the YAML will make netplan fail to apply. Always run netplan generate to catch syntax errors.
- Using the wrong interface name:
- Conflicts with NetworkManager or another service:
If a desktop install or cloud image uses NetworkManager, Netplan may be set to use NetworkManager as renderer. Edit the correct renderer or disable the conflicting manager.
# Check what's managing interfaces:
cat /etc/netplan/*.yaml
# If renderer: NetworkManager, either change to networkd for server usage
# or configure static IPs via NetworkManager.
Modern systems use predictable interface names (enp*, ens*). Configure the exact name shown by ip addr show or you will not change the intended device.
ip link show
Example command to check YAML parsing:
sudo netplan generate
Next Steps
Monitor and document: Add the static addressing details to your inventory and set up basic monitoring (ping/uptime).
# Example: simple ping check from another host
ping -c 3 192.168.1.100
Reserve the static IP in your router or DHCP server (optional) so other devices won’t get the same address.
# Note: action is performed on your router/DHCP server GUI — no direct command here.
Secure access: Add or verify SSH key authentication and restrict password logins.
# Check ssh config
sudo nano /etc/ssh/sshd_config
# Reload sshd after changes
sudo systemctl reload sshd
Wrap-up
You now know how to gather network info, write a Netplan YAML for a static IPv4 address, apply the configuration safely, and verify connectivity. When editing network settings remotely, prefer sudo netplan try or keep a console access method (cloud provider console or out-of-band) available in case you need to recover connectivity.
👉 Explore more IT books and guides at dargslan.com.