How to Configure a Swap File on Linux
Short introduction
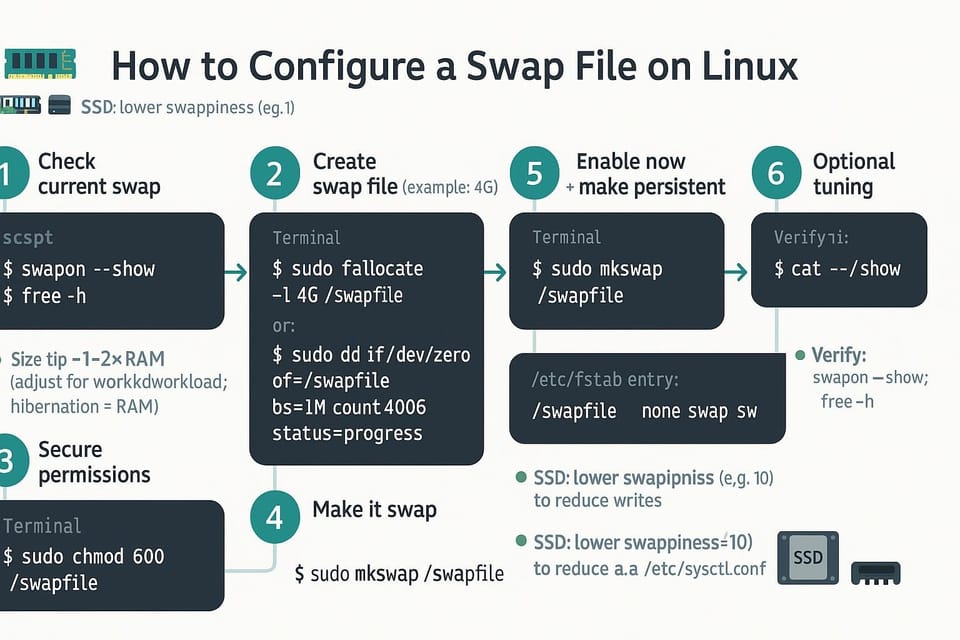
Swap provides an overflow area on disk for when physical RAM is full. Configuring a swap file is a straightforward, flexible way to add swap space on Linux without repartitioning. This guide walks through creating, enabling, tuning, and making a swap file persistent — with clear commands and examples.
Understanding swap and when to use it
Swap acts as virtual memory: pages that aren't actively used can be moved from RAM to disk to free memory for active processes. It’s not a replacement for RAM — disk-backed swap is orders of magnitude slower — but it prevents out-of-memory (OOM) kills and allows hibernation on some setups.
Typical use cases:
- Servers/VMs with limited RAM that occasionally spike memory usage.
- Desktop/laptop systems that need hibernation (swap should be at least as large as RAM for hibernation).
- Systems where adding physical RAM is temporarily impossible.
Check current memory and swap status:
# View memory and swap usage
free -h

# Show active swap areas
swapon --show
Notes:
- Swap size suggestion: for general use, 1× to 2× RAM for very low-RAM systems, or a few GB for modern machines. For hibernation, match or exceed RAM size.
- Consider wear on SSDs; modern SSDs handle written data well, but heavy swap activity can increase writes.
Creating a swap file
You can create a swap file using fallocate (fast) or dd (works everywhere). Example: create a 4 GiB swap file.
Using fallocate (preferred if supported):
sudo fallocate -l 4G /swapfile
If fallocate is not available or you want guaranteed zeroed space (some filesystems create sparse files with fallocate), use dd:
sudo dd if=/dev/zero of=/swapfile bs=1M count=4096 status=progress
Set the correct permissions so only root can read the file:
sudo chmod 600 /swapfile
ls -lh /swapfile
Initialize the file as swap and enable it:
# Prepare the file
sudo mkswap /swapfile

# Enable swap immediately
sudo swapon /swapfile

# Confirm it's active
swapon --show
free -h
If you need a different size, change the 4G/count values accordingly. To remove a swap file:
sudo swapoff /swapfile
sudo rm /swapfile
Enabling and tuning swap behavior
After enabling swap, you can tune kernel parameters that control how and when swap is used. The main parameter is vm.swappiness (0–100). Lower values reduce swapping; higher values favor keeping cache free by swapping earlier.
Check current swappiness:
cat /proc/sys/vm/swappiness
Temporarily set swappiness (resets on reboot):
# Set swappiness to 10
sudo sysctl vm.swappiness=10
Permanently set swappiness by adding to /etc/sysctl.conf or a file in /etc/sysctl.d/:
# Edit /etc/sysctl.d/99-sysctl.conf and add:
vm.swappiness=10

# Apply immediately
sudo sysctl --system
You can also adjust vm.vfs_cache_pressure (controls inode/dentry cache reclaiming) if you want to keep filesystem cache longer:
# Example: prefer keeping cache
sudo sysctl vm.vfs_cache_pressure=50
Monitoring swap usage and swaps per second:
# Show real-time memory and swap activity
vmstat 1

# Or use top/htop and look at swap and memory columns
top
Tuning tips:
- Desktop: vm.swappiness=10–20 is common to avoid stuttering.
- Server: vm.swappiness=1–10 if you want to prioritize RAM and avoid swapping.
- Heavily loaded services may prefer different settings; test under load.
Making swap permanent and managing fstab
To activate the swap file automatically at boot, add an entry to /etc/fstab. First get the UUID (optional) or reference the file path.
Simplest fstab entry (file path):
/swapfile none swap sw 0 0
Example of adding it:
# Open fstab in an editor
sudo nano /etc/fstab

# Add the line:
/swapfile none swap sw 0 0

# Save and exit, then test by turning swap off and back on
sudo swapoff -a
sudo swapon -a

# Verify
swapon --show
Using the file's UUID is less common for swap files, but you can rely on the file path. Ensure the swap file exists and has correct permissions before rebooting — otherwise boot may stall if your system is configured strictly. To safely test fstab entries, use swapon -a as shown.
If you need to resize swap:
- Disable swap: sudo swapoff /swapfile
- Remove file and create a new one with a different size (or create another swap file).
- Re-enable and update /etc/fstab if you change file path.
Commands table
| Command | Purpose | Notes / Example |
|---|---|---|
| free -h | Show memory and swap usage | free -h |
| swapon --show | List active swap areas | swapon --show |
| fallocate -l 4G /swapfile | Create swap file quickly | sudo fallocate -l 4G /swapfile |
| dd if=/dev/zero ... | Create swap file if fallocate not suitable | sudo dd if=/dev/zero of=/swapfile bs=1M count=4096 |
| chmod 600 /swapfile | Secure swap file permissions | sudo chmod 600 /swapfile |
| mkswap /swapfile | Mark file as swap area | sudo mkswap /swapfile |
| swapon /swapfile | Enable swap immediately | sudo swapon /swapfile |
| swapoff /swapfile | Disable swap | sudo swapoff /swapfile |
| sysctl vm.swappiness=10 | Set swappiness temporarily | sudo sysctl vm.swappiness=10 |
| echo "vm.swappiness=10" > /etc/sysctl.d/99-sysctl.conf | Set swappiness permanently | Use editor instead of overwrite in real use |
Example copy-paste snippet for a common workflow:
sudo fallocate -l 4G /swapfile
sudo chmod 600 /swapfile
sudo mkswap /swapfile
sudo swapon /swapfile
echo '/swapfile none swap sw 0 0' | sudo tee -a /etc/fstab
Common Pitfalls
- Forgetting to set permissions (chmod 600): swap will refuse to enable if the file is world-readable.
- Adding an incorrect /etc/fstab entry: a malformed or pointing-to-nonexistent swap file can slow boot or drop you to an emergency shell; test with swapoff/swapon before reboot.
- Using sparse files or files on special filesystems: some filesystems (or fallocate with certain flags) can create sparse files that aren't suitable for swap. If swap fails, use dd to create a fully allocated file.
Next Steps
- Monitor under load: use vmstat, top, and free to observe swap behavior and adjust vm.swappiness.
- Consider zram or swap on fast NVMe for workloads sensitive to swap latency.
- If you need hibernation, ensure swap size >= RAM and follow your distro’s hibernation configuration guides.
This guide shows a safe, repeatable process: create a swap file, secure it, enable it, tune kernel parameters, and make the change persistent. Swap is a simple tool to increase system resilience, but always monitor and tune to your workload.
👉 Explore more IT books and guides at dargslan.com.