Setting Up a Local DNS Resolver with bind9
Introduction
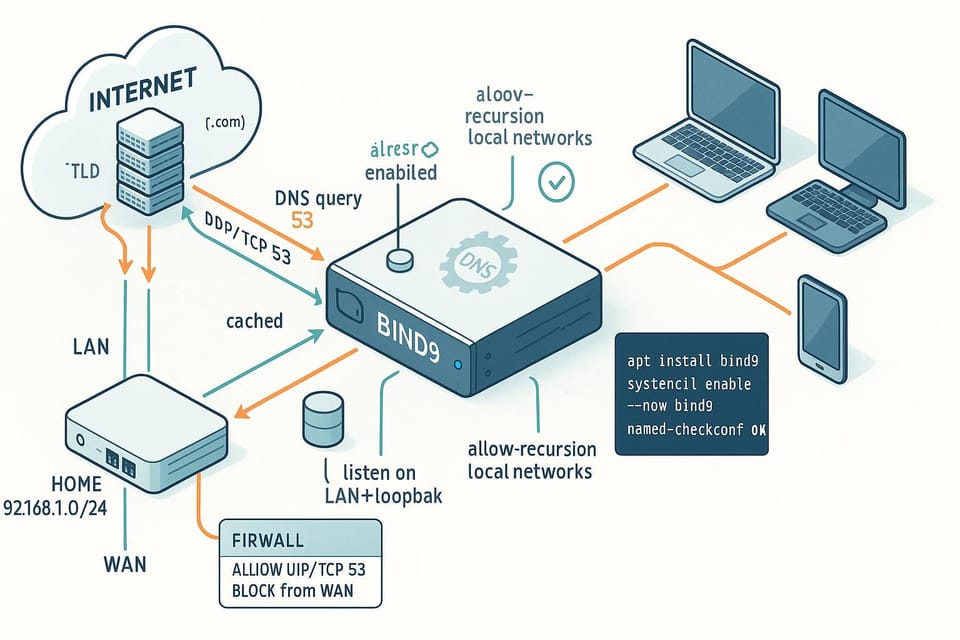
This tutorial walks you through setting up a local DNS resolver using bind9 on a Debian/Ubuntu-style system. It assumes a single machine acting as a caching/recursive resolver for your LAN (or for local development) and explains installation, basic configuration, testing, and hardening in a beginner-friendly way.
Requirements and overview
Before you begin, make sure you have:
- A Linux machine (Debian, Ubuntu, or similar) with sudo/root access.
- A stable internet connection (for forwarders and package installation).
- Optional: a static LAN IP if other machines will query this resolver.
What we will accomplish:
- Install bind9.
- Configure it as a recursive, caching resolver for local clients.
- Optionally forward queries to upstream resolvers.
- Test, secure, and tune basic settings.
Example: check your OS and update packages
# Confirm OS
cat /etc/os-release

# Update package index
sudo apt update
Install bind9 and useful commands table
Install bind9 using your package manager, enable the service, and check its status.
Installation and basic service commands:
sudo apt install bind9 bind9utils -y
sudo systemctl enable --now bind9
sudo systemctl status bind9
Commands table
| Command | Purpose |
|---|---|
| sudo apt update && sudo apt install bind9 bind9utils -y | Install bind9 and helper utilities on Debian/Ubuntu |
| sudo systemctl enable --now bind9 | Enable and start bind9 immediately |
| sudo systemctl status bind9 | Check service status |
| sudo journalctl -u bind9 -f | Stream bind9 logs for troubleshooting |
| dig @127.0.0.1 example.com | Query the local resolver directly |
| sudo ufw allow 53/tcp && sudo ufw allow 53/udp | Open DNS ports in uncomplicated firewall |
Verify bind9 is listening on port 53 (both UDP and TCP):
sudo ss -tunlp | grep :53
# or
sudo lsof -i :53
If bind9 is not listening, check the logs:
sudo journalctl -u bind9 --since "10 minutes ago"
Configure bind9 as a local recursive resolver
The primary configuration file for Debian/Ubuntu is /etc/bind/named.conf.options. We'll configure recursion, forwarders (optional), and restrict queries to local networks for safety.
Example named.conf.options (edit as root):
sudo nano /etc/bind/named.conf.options
Paste or modify the options section:
options {
    directory "/var/cache/bind";

    recursion yes;                // allow recursive queries
    allow-recursion { localnets; localhost; };
    allow-query { localnets; localhost; };
    listen-on { 127.0.0.1; 192.168.1.0/24; };  // adjust to your LAN
    listen-on-v6 { none; };

    // Use upstream resolvers (change as desired)
    forwarders {
        1.1.1.1;
        8.8.8.8;
    };

    dnssec-validation auto;
    auth-nxdomain no;    // conform to RFC1035
    listen-on-v6 { any; };
};
After saving, reload bind9:
sudo systemctl reload bind9
# or restart if reloading gives issues
sudo systemctl restart bind9
Make your machine (or clients) use the resolver:
- For the local machine, edit /etc/resolv.conf or systemd-resolved configuration to point to 127.0.0.1.
# Temporary (will be overwritten by some systems)
sudo sed -i '1inameserver 127.0.0.1' /etc/resolv.conf

# To persist with Netplan / systemd-resolved, update the appropriate config files instead.
Test basic resolution using dig:
dig @127.0.0.1 example.com +short
# Expect an IPv4 or IPv6 address in response
Check cache functionality by timing queries:
dig @127.0.0.1 example.com
# Run again and note the "Query time:" value should be lower for cached responses.
Secure, tune, and troubleshoot
Bind can be tuned for performance and secured to avoid being an open resolver exposed to the internet.
Secure bind9: restrict who can query/recursion and bind to specific interfaces
# Ensure allow-query and allow-recursion include only localhost and your LAN:
allow-recursion { localhost; 192.168.1.0/24; };
allow-query { localhost; 192.168.1.0/24; };
listen-on { 127.0.0.1; 192.168.1.10; };  # replace with your server IP
Firewall example (UFW) to allow only your LAN to access DNS:
# Allow DNS from LAN only
sudo ufw allow from 192.168.1.0/24 to any port 53 proto udp
sudo ufw allow from 192.168.1.0/24 to any port 53 proto tcp

# Deny DNS from everywhere else (if default policy is allow)
sudo ufw deny 53
Rate-limiting and query limiting (basic anti-abuse):
Add to options in named.conf.options:
rate-limit {
    responses-per-second 5;
};
Troubleshooting tips and commands:
# View live logs
sudo journalctl -u bind9 -f

# Test for open resolver from a remote machine
dig @your.resolver.ip whoami.akamai.net TXT +short

# Test specific behavior (recursion)
dig @127.0.0.1 example.com +norecurse
If bind fails to start, common quick checks:
- Syntax errors in configuration:
sudo named-checkconf
sudo named-checkzone example.com /etc/bind/db.example.com
- Permissions on zone files or /var/cache/bind.
Testing and verifying behavior
You want to confirm the resolver is correct, caching, and not open to the internet.
Query the local resolver:
dig @127.0.0.1 example.com
Compare timings to public resolver:
dig @1.1.1.1 example.com
Check cache effectiveness by re-querying:
# First query (uncached)
dig @127.0.0.1 example.com

# Second query (should be faster)
dig @127.0.0.1 example.com
Confirm recursion is restricted (from a remote machine outside allowed nets):
dig @your.resolver.ip example.com
# If restricted, you should see a SERVFAIL or REFUSED response for recursive queries.
If you use systemd-resolved on Ubuntu, make sure it doesn't conflict. Either:
- Configure systemd-resolved to forward to 127.0.0.1, or
- Disable systemd-resolved and manage /etc/resolv.conf manually:
sudo systemctl disable --now systemd-resolved
sudo rm /etc/resolv.conf
sudo bash -c 'echo "nameserver 127.0.0.1" > /etc/resolv.conf'
Common Pitfalls
- Forgetting to restrict queries: leaving allow-query or allow-recursion open can make your server an open resolver and vulnerable to abuse.
- Conflicting local resolver (systemd-resolved): Ubuntu often runs systemd-resolved by default; it may overwrite /etc/resolv.conf and block your bind9 from being used.
- Firewall or listening interface misconfiguration: bind might be listening only on localhost while clients try connecting to the LAN IP (or vice versa); check listen-on and firewall rules.
Next Steps
- Enable DNSSEC validation and monitoring: configure more detailed logging and integrate with monitoring tools.
- Add local zones for development: create forward and reverse zones for local hostnames to simplify local access.
- Consider DoT/DoH or split-horizon setups: if you need privacy or different answers for internal/external clients, explore DNS-over-TLS, DNS-over-HTTPS, or view-based zones.
End notes
This setup gives you a robust local caching resolver suitable for home labs or small networks. Always test changes carefully, monitor logs after configuration updates, and keep bind9 updated for security patches.
👉 Explore more IT books and guides at dargslan.com.