Setting Up a Basic Firewall with iptables
A basic firewall is one of the first layers of defense you should add to a Linux system. This short tutorial walks you through the essential concepts and commands to set up a simple, safe iptables-based firewall that allows common traffic while preventing unsolicited inbound connections.
Understanding iptables basics
iptables is the traditional user-space command-line tool for configuring the Linux kernel's netfilter packet filtering subsystem. Rules are grouped into tables (filter, nat, mangle) and chains (INPUT, FORWARD, OUTPUT for the filter table). Each packet is checked against the rules in the relevant chain; the first matching rule decides the fate (ACCEPT, DROP, REJECT, etc.), otherwise the chain policy applies.
Key beginner concepts:
- Chains process packets in a flow (INPUT = packets to local system, OUTPUT = packets from local system, FORWARD = routed packets).
- Order matters: rules are evaluated from top to bottom.
- Use
-m conntrack --ctstate(or-m state --stateon older kernels) to allow established/related connections so responses to allowed outbound connections are permitted back in.
Example: list currently loaded iptables rules and default policies.
# Show filter table with line numbers and policies
sudo iptables -L -n -v --line-numbers
# Show nat table (for reference)
sudo iptables -t nat -L -n -v
Inspecting current rules and policy
Before changing anything, inspect what is already configured. This prevents accidental lockouts and helps you craft rules that layer on top of the existing setup.
Commands to examine rules:
# Verbose listing for the filter table (default)
sudo iptables -L -n -v

# Show rules with packet/byte counters and line numbers (useful to delete specific lines)
sudo iptables -L -n -v --line-numbers

# Show specific chain (e.g., INPUT)
sudo iptables -L INPUT -n -v
Interpretation tips:
- The top of each chain shows the policy (e.g.,
Chain INPUT (policy ACCEPT)). - Packet/byte counters let you see if a rule is being used.
- Note whether there are existing
ACCEPTrules for SSH (port 22) or other services you depend on.
If you are on a remote machine (SSH), never set a DROP-all policy before ensuring an allow rule for your SSH connection exists. One safe approach is to add SSH allow rules first and verify connectivity in a separate session.
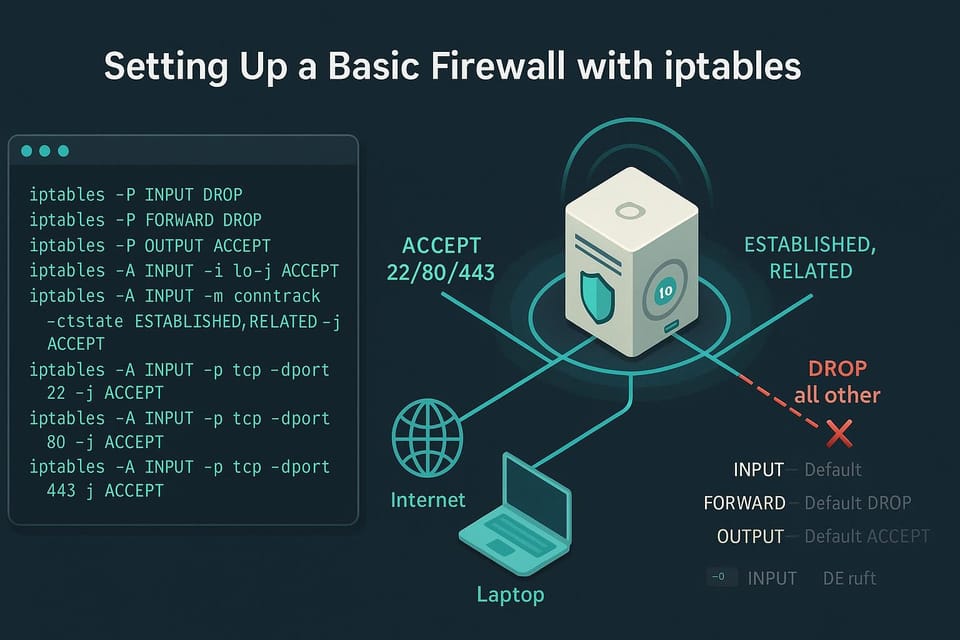
Building a simple rule set (step-by-step)
This section shows a minimal, practical rule set for a typical server: allow loopback, allow established/related, allow SSH, allow outgoing HTTP/HTTPS, allow ICMP ping optionally, and set default policy to DROP on INPUT and FORWARD.
Flush existing rules and set default policies to ACCEPT temporarily while you build.
```bash
Flush all current filter rules (do this cautiously)
sudo iptables -F
sudo iptables -X
Set default policies to ACCEPT while testing
sudo iptables -P INPUT ACCEPT
sudo iptables -P FORWARD ACCEPT
sudo iptables -P OUTPUT ACCEPT
2. Allow loopback traffic and drop traffic to loopback not coming from lo interface.
```bash
# Allow loopback
sudo iptables -A INPUT -i lo -j ACCEPT
# Drop packets claiming to be from loopback but not on lo
sudo iptables -A INPUT ! -i lo -s 127.0.0.0/8 -j DROP
Allow outgoing web access (optional) and allow HTTP/HTTPS to this server if hosting a web service.
```bash
Allow outgoing HTTP/HTTPS
sudo iptables -A OUTPUT -p tcp --dport 80 -m conntrack --ctstate NEW,ESTABLISHED -j ACCEPT
sudo iptables -A OUTPUT -p tcp --dport 443 -m conntrack --ctstate NEW,ESTABLISHED -j ACCEPT
Allow SSH (replace 22 with your SSH port if nonstandard).
# Allow incoming SSH
sudo iptables -A INPUT -p tcp --dport 22 -m conntrack --ctstate NEW -j ACCEPT
Allow established and related connections (critical so responses to outgoing traffic are allowed).
sudo iptables -A INPUT -m conntrack --ctstate RELATED,ESTABLISHED -j ACCEPT
If hosting a website, allow incoming HTTP/HTTPS
sudo iptables -A INPUT -p tcp --dport 80 -m conntrack --ctstate NEW -j ACCEPT
sudo iptables -A INPUT -p tcp --dport 443 -m conntrack --ctstate NEW -j ACCEPT
6. (Optional) Allow ICMP (ping).
```bash
# Allow ping (echo-request)
sudo iptables -A INPUT -p icmp --icmp-type echo-request -m conntrack --ctstate NEW -j ACCEPT
Finally, set default policies to a restrictive stance.
```bash
Set default DROP for incoming and forwarded packets
sudo iptables -P INPUT DROP
sudo iptables -P FORWARD DROP
Keep output permissive for standard client machines
sudo iptables -P OUTPUT ACCEPT
After applying, always test from another terminal or machine to confirm you haven't locked yourself out (especially SSH). If something goes wrong, you can revert the defaults if you still have an active root session:
```bash
sudo iptables -P INPUT ACCEPT
sudo iptables -F
Persisting rules and restoring after reboot
iptables rules are not persistent across reboots by default. There are several standard ways to save and restore them.
Method A: iptables-save / iptables-restore
# Save current rules to a file
sudo iptables-save > /etc/iptables.rules

# Restore manually (use in boot scripts or systemd unit)
sudo iptables-restore < /etc/iptables.rules
Method B: Distribution tools
- RHEL/CentOS: use service scripts or firewalld (if you prefer firewalld, consider switching; do not mix both).
Debian/Ubuntu: install and use netfilter-persistent
sudo apt install iptables-persistent
# Save current rules
sudo netfilter-persistent save
# Rules will be loaded at boot automatically
Method C: systemd unit (if you prefer explicit control)
# Example /etc/systemd/system/iptables-restore.service
[Unit]
Description=Restore iptables rules
Before=network-pre.target
Wants=network-pre.target

[Service]
Type=oneshot
ExecStart=/sbin/iptables-restore /etc/iptables.rules
RemainAfterExit=yes

[Install]
WantedBy=multi-user.target
Then enable:
sudo systemctl daemon-reload
sudo systemctl enable --now iptables-restore.service
Always verify on reboot:
sudo iptables -L -n -v
Commands table
Below is a compact handy commands table for quick reference.
| Command | Purpose | Example |
|---|---|---|
| iptables -L -n -v | List rules in filter table (verbose, numeric) | sudo iptables -L -n -v |
| iptables -A [CHAIN] … | Append a rule to a chain | sudo iptables -A INPUT -p tcp --dport 22 -j ACCEPT |
| iptables -I [CHAIN] [N] … | Insert rule at position N | sudo iptables -I INPUT 1 -p icmp -j ACCEPT |
| iptables -D [CHAIN] [N] | Delete rule by line number | sudo iptables -D INPUT 3 |
| iptables -F | Flush all rules from a table | sudo iptables -F |
| iptables -P [CHAIN] [TARGET] | Set default policy for chain | sudo iptables -P INPUT DROP |
| iptables-save > file | Save current rules to file | sudo iptables-save > /etc/iptables.rules |
| iptables-restore < file | Restore rules from file | sudo iptables-restore < /etc/iptables.rules |
| iptables -t nat -L | List NAT table rules | sudo iptables -t nat -L -n -v |
You can copy-paste examples into your terminal, but always double-check port numbers, interface names, and whether you are on a remote host (SSH).
Common Pitfalls
- Locking yourself out: setting a default DROP on INPUT without an SSH allow rule in place will disconnect remote administration. Always add SSH allow first and keep a fallback session.
- Order and specificity: iptables evaluates rules top-down. A broad ACCEPT before a specific DROP (or vice versa) can produce unexpected results. Use
-Ito insert at the top or check line numbers when deleting. - Not saving rules: iptables changes are ephemeral by default. Forgetting to save means your firewall disappears after reboot. Test persistence by rebooting a test VM if possible.
Next Steps
- Learn connection tracking in depth: study
-m conntrack --ctstateand how RELATED,ESTABLISHED works to avoid accidental blocking of legitimate traffic. - Harden further: add rate-limiting for SSH (use
-m conntrack --ctstate NEW -m recentor-m limit) and restrict services to specific IPs where possible. - Explore higher-level tools: consider firewalld, nftables (the successor to iptables), or management frameworks (Ansible) for maintaining consistent firewall rules across machines.
This guide gives you a practical starting point. Always test rules carefully, keep an emergency access method (console or out-of-band), and review logs if connections are being blocked unexpectedly.
👉 Explore more IT books and guides at dargslan.com.